
Testing the all new Algolaser 5W DIY Kit
- WH Creations

- Dec 20, 2023
- 7 min read

I have always wanted a laser for the workshop. The laser I currently own is in my office, takes up a lot of room, while also using a whole host of other equipment such as a refrigeration unit to keep a constant low temperature, as well as an air pump to keep my lasered products clean and consistent.
I never like the times where an order comes in and I spend what seems like an eternity sat in my office, turning occassionally in my chair to change out the piece of ply for the next round of lasering work.
Being stuck in front of a pc for 8hrs a day, to a woodworker, is not a fun task, and I for one want to be in my workshop where the fun stuff happens.

So, when Algolaser reached out to me to review their new laser, I jumped at the chance, with the hope I would get out of my office and stay in the workshop.
What's an Algolaser?
My current laser is called the k40. I've never known what the "k" stands for, but the 40 implies the wattage of the laser. This is a CO2 laser, which means it uses a tube to run the laser through, which uses that refrigeration unit I spoke of earlier, to keep cool.
Its an incredible powerful laser and you only ever need to run it at 18% max for any kind of work. Running at higher percentages will cause your tube to expire sooner, but luckily its powerful enough to never need to.
The bed is limited at 300x200mm so you can only really ever work with A4 sized workpieces. This is a massive hinderance to me, as I work with large pieces of wood and I am always asked if I could laser onto it.
Outsourcing this kind of work isn't an option for me, due to the turn around times and frequency of the work.
Algo laser are a Chinese company offering budget friendly options for the hobbyist all the way through to the more expensive laser for professionals like myself. Their machines start from their beginner, 5W DIY laser all the way through to their 22w flagship engraver.

Depending on the type of wattage, will greatly determine the speed at which your laser can work. I liken it to a drag strip, where you would have a small slow car driving down the road. it will get to its destination, but it wont be fast. A mid level laser say 22w would be your mid range car, covering the same distance in a quicker time. 40w however will be your Porches, that will do the same job at the quickest of speeds.

So although you have a budget laser, doesn't mean that you are unable to do the same kind of work as the more expensive version, merely it will just take longer.
Algolaser do have a 40w laser coming out as soon as possible, and is in the final stages of development. I look forward to seeing this new product and wonder whether it will be in line with similar other lasers currently on the market, that have options for closed in lasers (lasers incased in an enclosure) or even pass through (which allows you to feed in longer workpieces than can fit ordinarily into your laser).
Why do I like this laser?
If I am truly honest with you, when I first started using the laser, I thought it was massively underpowered and didn't live up to the expectations I had for it. I feel I likened it too much to my current K40 machine, with high speeds and power options, but I shouldn't have. This laser will never be a K40 and being a diode means that it will never have the same power too.

It is however, extremely easy to use, and pairs effortlessly with Lightburn, which is software specifically designed for use with lasers in mind. Once connected, you are able to move the laser around your workspace, setting start positions easily. The different options available to you thereafter make going from a cut, to an engraving job, a breeze when compared to the K40, which would need upgrading the motherboard to be able to connect to Lightburn (an expense I just don't want to make), not to mention having to manually change the power settings between each job too.

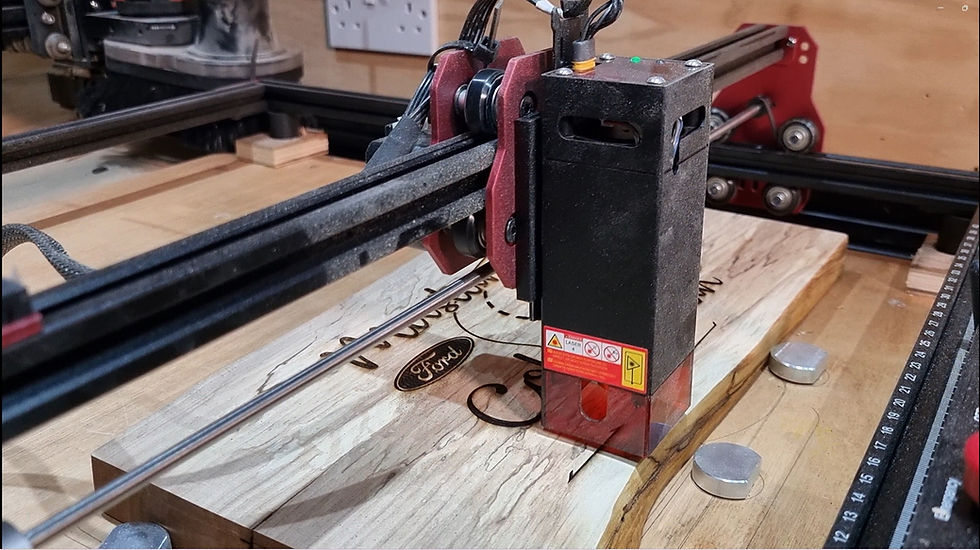
The 5w DIY laser kit, comes with adjustable feet, giving you the ability to change the height of the laser, so you can work with thick pieces of material. There is an option to purchase higher feet on their website, but currently I dont see the need to do this.

The work area is a large 400x400mm space and because of the way it is built, means I can feed larger pieces under its extruded aluminum rails. I would never be able to do this with my K40, and allows me to offer more services to my clients. I recently completed a charcuterie board for a customer from Olive wood. It was a large piece at just under 1m in length. The client had asked after ordering it whether there would be some way to add a small engraving on the underside. Normally this kind of work I would have to turn down, but I agreed and was able to slide the piece under the rails enough to engrave their initials quickly and efficiently.

What don't you like?
It would be cruel of me therefore to suggest that this laser has any faults, or to even mention the speed of the machine, giving the comparison I gave earlier of the drag strip. This is, I keep having to remind myself, is a 5W laser and when used with my discount code, is priced at only £157. Compared to the amount I spent on my K40 and all of the accessories that are needed just to turn the machine on, which was well in excess of £1000.
Speed however, is an issue. In my video showing my review in greater depth on my YouTube channel, I engrave 3 small words "Santa Stop Here" onto a pine board, which, dont get me wrong, came out looking amazing, did take a drawn out 11minutes to engrave.

Couple this with an engraving job I had for a client at a size of approximately 300x200mm which took a staggering 1hr 40mins. I am fortunate therefore that I can run this machine while tackling other jobs in the workshop. If I decided to upgrade the laser module on the laser, then the time taken to engrave the same piece, will drastically drop, but until I feel the need to fulfill larger orders, the speed isn't a huge hindrance to me, especially as it keeps me out of the office.
A huge let down to this machine is its cable management. On putting the machine together you are left with long trailing cables that are free to flop around and get caught. I had a

similar issue with my K40 when I was running the air assist pipe. It would droop down in the way of the laser beam and I would end up with melted plastic and heartache at the newly ruined work piece. I feel with time, I would have the same issues with this laser. While looking online for some 3d printable files, I came across someone who had created a file for a printable drag chain that would fit the machine. I thought that this was a great idea and for the cost of £5.99, from amazon, thought it would be a great way to fix the issue. I can confirm that it is by the way. I think Algolaser should look at this going forward, and am aware that their other more expensive machines do offer a great way to hide their cables. I suspect the reason why this machine is different is because you are able to modify it, either making it longer, changing the extruded aluminum rails, upgrading the laser module, raising it higher with longer adjustable feet, and any other crazy way you see fit.
Final thoughts
Since using this machine I had made my own upgrades that will help me and my workflow.

As mentioned, using the drag chain for cable management, but also the base of the machine, or my work area. If you really wanted to, you could place this laser on top of your material, set the height using the supplied gauge, and get lasering. This however brings up a few issues, namely jolting the machine and it then going onto engrave or cut where you dont intend it to.
This exact thing happened to me when I first went to use it. Luckily I was using scrap offcuts to test speeds and power settings, so wasn't a huge issue. Space for me in my workshop is limited to having a dedicated place for the laser to sit just isn't available.

I decided to have the laser sit on a plywood base and had first envisioned cutting out a groove for the feet to sit in. I quickly changed my mind as I wanted to be able to hang it onto my wall space (greatly helping me reduce on my non existent worktop space). I decided to enclose the feet using more plywood that would be connected to the base. Doing it this way means I am able to lift the laser out if required, but when moved around or hung on the wall, would use friction to keep it from moving.
After the laser was placed on the plywood base, I then started gluing fence guides in place to laser out multiple duplicate pieces where I would need to remove and replace a new piece in the same place as before. I quickly realised that this would not do and I needed to come up with a way I could speed this up.

I ended up designing a layout in Lightburn, where I marked x's that would then be drilled out on the drill press.

I could then install some aluminum dogs that I had purchased online, to act as my 90 degree reference fence. Being dogs, they are removeable and can be adapted to suit any size or shape I need. Using the same file in Lightburn, I can quickly and easily zero my axes to where the workpiece is when referenced with the dogs.
This is a massive upgrade that I am glad i took the time to create, and means I can place my work piece down and get to cutting or engraving without the need to measure or mark each time I turn the laser on.
Where can I buy one?
If you feel this laser is for you, you can purchase the laser through my affiliates link,
Use code: 1995W for $40 off the 5W laser bringing the price down to an incredible £157! (at time of this blog)

Buying through this link doesn't incur any cost to you as a buyer, but does mean I will receive a percentage of the purchase price, that does go a long way to helping me make more informational videos on YouTube.

Comments